 |
| Make your own advent calendar following simple steps |
 |
| The nativity scene |
2 x Templates (for younger children to use) made from card measuring approx 14cmL X 13cmW (make one with side tabs - see the samples shown in photograph of materials/equip below). NB:These can be used to make the stable doors which opens to reveal the nativity scene. The shape should have straight sides to halfway and curved top (like a slice of bread). Label as Template 1 and 2 (ensure Template 2 has side tabs).
A sheet of paper, ideally one centimetre wider than the width of standard A4 (22cm W), the length must be at least 18cm long.
Wax Crayons (I would recommend using beeswax blocks from Stockmar they come in a block set of 16 assorted colours ( click here to link to UK supplier),) and Brusho Watercolour Inks purchase a starter pack from www.colourcraft.com (comes in powder form and make up washes in jars) - watercolour paints or indian inks will work well too, just bear in mind that the wax will need to resist the paint/ink that is applied.

Also: A pencil, blue tac, ruler, eraser, paint (watercolour) brush of medium thickness, hole punch, stapler, PVA glue, scissors, craft knife, black felt tip (prefebably a thick artists pen), glitter glue, glue brush, silver/gold thread.
xxxxxxxxxxxxxxxxxxxxxxxxxx
What You Need To Do
 |
| Figure 1 |
- Take the rectangular card and using Template 1 (the template without the side tabs), position approx 2cm from the bottom and 4cm in from the left side. Draw around it. Using scissors or the craft knife, ensuring that something sits underneath for safety and to protect the working surface, cut out the shape drawn from the rectangular card. The spare cut-out can be used later to make a star and a door lock.
 |
| Figure 2 |
- Take the sheet of paper and using Template 1 once again, draw a pencilled outline of the shape onto the paper. Do this by having the straight edge of the the template sit 2cm up from the bottom and the left side of the template position 4cm in from the left side of the paper, the same as you did with the card. Place the paper behind the card and check to see that the contours of the outline on the paper matches that of the gap in the card - like a window through to the back that will seal it eventually: Do not stick the paper to the back at this point, as the scene within the stable now needs to be drawn within the outline on the paper, with pencil and/or, coloured in with wax crayon. Black outlines with felt/artist's pen can be added for definition See Figure 3. Alternatively, for little ones, it may be easier to draw around a couple of stencils of the figures See Figure3a
 |
| Figure 3 |
 |
| Figure 3a |
- Take Template 2 (with side tabs) and make a set of stable doors. Draw around the template onto quality white card as used for the front. Cut away the shape. Draw a line down the centre and cut through to make two doors. Put aside.
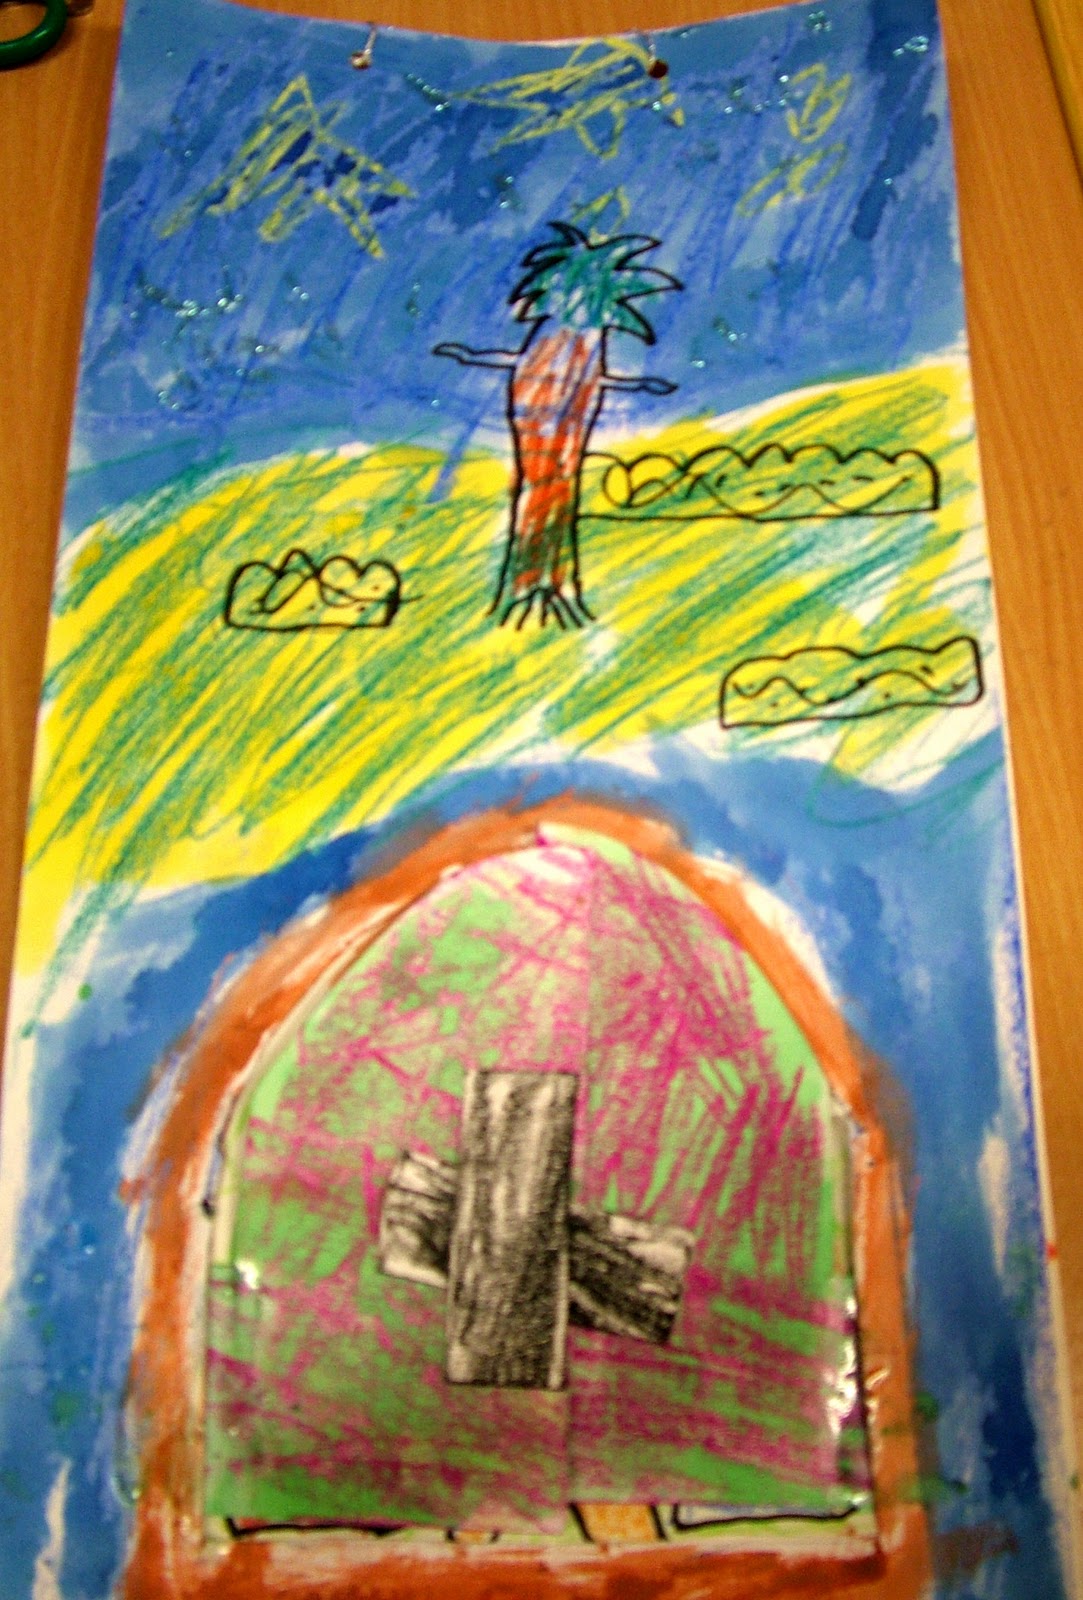
- Take the rectangular card, and create a design of Bethlehem under a night sky using the waxes. Press down hard, on a hard surface, using the sides and corners of the blocks to gain different effects and textures. Make a dome shaped band of colour (approx 3cm thick) around the gap's outline (I used different shades of red and orange as you see in the first picture that sits at the beginning of this blog entry) - this will be the outside walls/roof of the stable. Also colour in the doors flaps with wax. Colour both sides. I used red and orange tones on the outsides so when the doors are closed they match the outside walls of stable, and then I used yellow tones on the insides to match the internal scene within once this is revealed when the doors are opened. It is important to know, as you will see from Figure 4 that it does not matter if the choice of colours used, when waxing up the picture do not emulate the desired colour of the finished piece, at this point. Use as many different patches colours as possible and intermingle different tones of one colour all around. The more wax applied the better the end result.Add palm trees, rocks and distant buildings using black wax crayon, and don't forget a few stars in the sky, and press down hard. Now paint over everything you have coloured, using inks/paint colours that compliment. The addition of fibrant inks will intensify, as will watercolour paint but to a lesser degree Figure 4a.
 |
| Figure 4 |
 | |||
| Figure 4a |
- The ink/paint dries very quickly, and so you should be ready for the next step, and that is to assemble. Smear PVA glue around the edges of the paper and position this to the back of the card as you did in the trial previously, when happy that the nativity scene sits nicely through the gap of the frame, stick down. Take one door side/panel, and bend back and crease along the straight edge, so that the side tabs become hinges and allow the door panel to flap. Apply PVA glue to the front side of tab and carefully insert behind the frame. Press and hold for a few moments. Repeat with the other door.
- Measure and draw a thick line down the middle of the calendar, starting approx 1cm down from the top to the stable.Using the craft knife and a cutting board, or strip of blue tac underneath for protection make 23 x 1.5cm slots along the line. Ensure that each slot made breaks through the card and the backing paper behind (if present). To use the calendar: each slot represents one day in December, a star is moved daily down toward the stable, the door remains shut until Dec 24th - it is this day you reveal the nativity scene, as the story goes Jesus was born overnight on this night, therefore it is traditional to count 24 days on an advent calendar (not 25).
- To make the star. Draw and cut out a star shape from the spare card, or use a suitable stencil. Colour in (both sides). make a tab that will fit in the slots (so no wider than 1.5cm), and approx 4cm long. Staple the star to it (this is your indicator so ensure that this fits each slot made). Postion in the first slot at the top, ready for Dec 1st.
- To make the door lock. Cut out two small rectangular shapes from spare card. One that measures 1.5cmW x 8cmL approx and one that measues 1cmW x 6cmL approx. Colour in, both sides. Take the longer strip and bend back each end by a centimetre or so to make a double thickness, position on the left door panel and staple or stick the area which is double, allow the card that's left to flex a little. On the right door panel postion the strip horizontally and stick down the right end of the piece to the right door panel using a staple or glue, so that the tab can be inserted behind the strip on the left door so the doors can close and remain shut.
- Finishing touches now...strengthen the black features using more wax and black felt/artist's pen, and add glitter to the night sky. Punch holes at top, hang with silver/gold thread.


xxxxxxxxxxxxxxxxxxxxxxxxxxxxxxxxxxxxxxxxxxxxxxxxxxxxxxxxxxxxx
I ran a workshop in Central Birmingham last Saturday (20th Nov) making these calendars - See photos below:


If you have any queries please enter as a comment below.
I'd love to hear from you. Even
better I'd love to see photos of your own calendars!

0 Comments
POST your comment here: